The suppression list is a special type of subscriber list. There is only one per account, and it contains email addresses you don't want to send to, to help protect your sending reputation. Email addresses on the suppression list can't be accidentally imported or added to your regular subscriber lists.
Below, we'll explain how email addresses are automatically added to the suppression list, and how you can suppress email addresses yourself. This comes in handy if you've previously maintained a "do not email" list in an external tool, or switched to us from another email service provider.
Automatically added addresses
A subscriber's email address is automatically added to the suppression list if:
When viewing the suppression list, the reasons for the above items will be shown as either "Unsubscribed", "Marked as Spam" or "Bounced".
If the list Unsubscribe option is set to "Remove subscriber from this list only", the subscriber will not be added to your suppression list.
Manage the suppression list
To access the suppression list, you must have at least one subscriber list. Then, to manage it:
- Click Lists & subscribers.
- Click Suppressions on the left menu.
You will then see the suppression list, and the reason each email was added to the list. If they were added automatically, the reason will be "Unsubscribed", "Marked as Spam" or "Bounced". If you see "Suppressed", it means the email address was added manually.
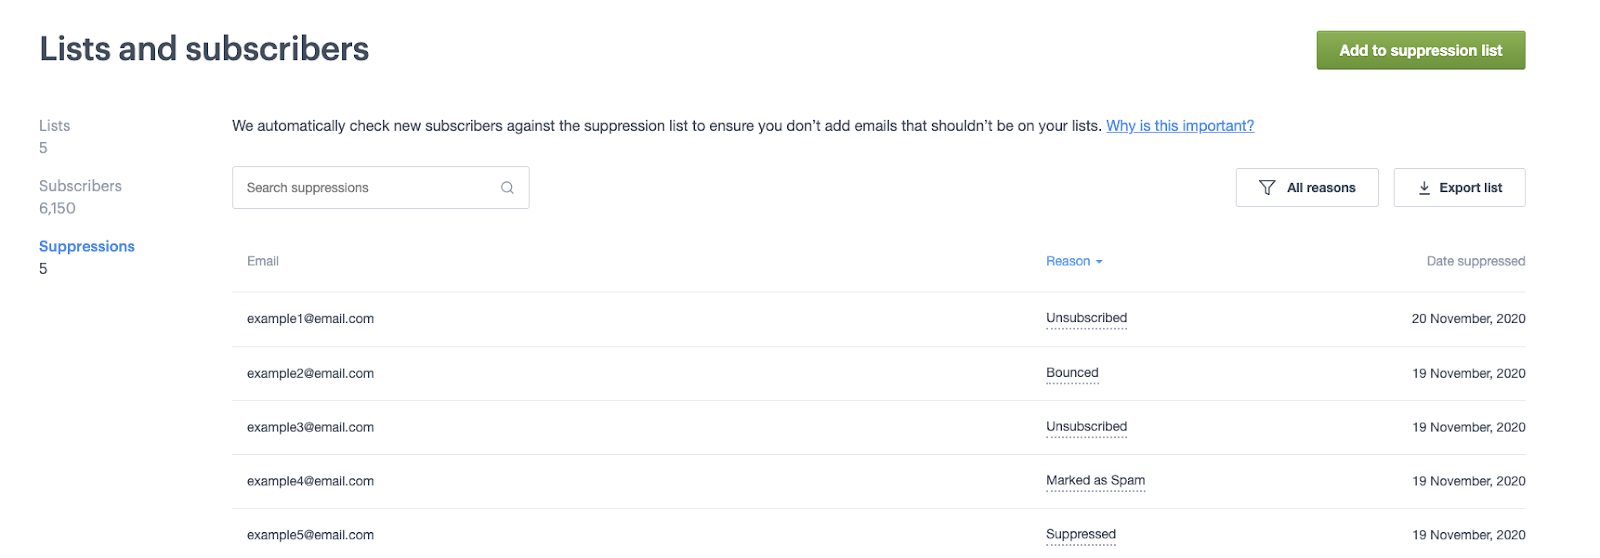
To export the suppression list, in CSV or tab delimited format, select Export list, above the table.
Add email addresses
To manually add email addresses to the suppression list, click Add to suppression list on the top right side of the page, then follow the instructions.
Email addresses added in this way will have the reason "Suppressed".
There are two ways you can add to suppression list:
- Enter email addresses – Enter or paste each email address on a new line.
- Import a file – Drag-and-drop a file from your computer or click upload a file. The file should have one column containing email addresses.
You can add up to 50,000 emails at a time.
Remove email addresses
To remove email addresses from the suppression list, select the checkbox to the left of the email addresses you want to remove, then click Remove from suppression list.
When removing an email address from the suppression list, you also need to change its subscriber status back to "Active" for the list it was on. Learn how to resubscribe an unsubscribed email.
Suppression list overrides
Email addresses on the suppression list can still be added to a subscriber list, if subscribers:
- Sign up again after unsubscribing, through a signup form.
- Are added or updated via the API with resubscribe set to true.
- Have their status changed from "Bounced", "Marked as Spam" or "Unsubscribed" to "Active".
These methods bypass the suppression list for the chosen subscriber list only. The email address will remain on the suppression list, to prevent it being accidentally imported or added to other subscriber lists.